Showing posts with label Dr. Seuss. Show all posts

Dr. Seuss Baby Shower

Friday, March 2, 2012

Happy Birthday Dr. Seuss! You all know that we love Dr. Seuss at our house. We basically have an entire room dedicated to him. Well since today is the doctors birthday I thought I would share some fun ideas for throwing a Dr. Seuss baby shower. Since my son’s nursery is Dr. Seuss themed I was thrown a Dr. Seuss baby shower. Now granted my son will be turning 2 in just a few weeks. This wasn’t a recent shower. I still thought it would be fun to take a look at the amazing shower that our amazing mother threw for me.

DSC03420 copyDSC03413

We had themed food to match a few of the books. We had green eggs and ham rolls. The green eggs were just chocolate eggs covered in green foil. The ham rolls were ham, cream cheese and chives all rolled together. Yum!

DSC03409 copy

One fish, two fish cupcakes!

DSC03410 copy

Cat in the Hat and Thing 1 and Thing 2 cupcakes. The cat in the hat cupcakes are topped with red lifesavers and white mints. The thing cupcakes were topped with lots of delicious frosting!

DSC03388 copyDSC03415 copy

We even had cat in the hat striped Jell-O!

DSC03419 copy

It was such a fun baby shower!

DSC03392 copyDSC03393 copyDSC03394 copyDSC03401 copyDSC03404 copyDSC03405 copy

Thanks again for the shower!

If you are looking for some other Dr. Seuss projects. Check out the following:

Dr. Seuss reading corner

Dr. Seuss storage boxes

Dr. Seuss mobile

41D7BC788C40AFDD713E5833753FB8F5

Dr. Seuss Reading Corner

Monday, October 31, 2011

I recently added a little reading corner to my son’s room. As you may know, my son’s room is Dr. Seuss themed. So everything that I added has a hint of Dr. Seuss.

SONY DSC

The room already had a couple of book shelves.

SONY DSC

SONY DSC

Underneath the shelves I added a magnet wall.

SONY DSC

I just used Rustoleum magnet paint. This stuff is amazing! You can even paint over the magnet paint so that the magnet wall can just blend right in with the rest of the wall. I decided to leave it for the time being so that my son can see the contrast between where to put the magnets and where not to. I think eventually I’ll paint over it and then just frame the part of the wall that is magnetized.

Here is the wall before right we painted it.

SONY DSC

I love the magnets on the wall. I happened to come across some Dr. Seuss foam stickers at Hobby Lobby one day. They came in a pack of 200. I thought that they would be perfect for this project. I just converted them to magnets by adding some adhesive magnet tape to the back of each sticker.

SONY DSC

SONY DSC

There are some cool magnets. All of the ABC’s, plus pictures of Dr. Seuss books and characters. They even have a magnet for every page of Green Eggs and Ham so you can even read the book right there on the magnet wall.

SONY DSC

In addition to the magnet wall, I also sewed my son a bean bag chair using various Dr. Seuss fabrics. I used the Michael Miller child bean bag chair pattern.

SONY DSC

SONY DSC

It sits right next to his book shelf.

SONY DSC

Contrary to the story this picture tells, my son actually loves his chair. He spends a lot of his day sitting and reading in his bean bag chair. He just wasn’t interested in sitting in it when I wanted to take a picture.

SONY DSC

Here is a view of the entire reading corner, complete with a pennant banner made from Dr. Seuss book pages.

SONY DSC

Here are a couple of links to other Dr. Seuss projects in his room.

Cat in the Hat Mobile

Dr. Seuss Storage Boxes

P.S. Happy Halloween! We spent our evening reading Halloween books in our Halloween PJ’s. We’ve had 3 rounds of trick or treating over the last week so we took the night off from candy collecting to pass out candy to others. It was just as fun but without the sugar high. My son would get so excited every time the door bell rang!

SONY DSCSONY DSC

41D7BC788C40AFDD713E5833753FB8F5

Dr. Seuss Mobile

Monday, January 31, 2011

DSC06690

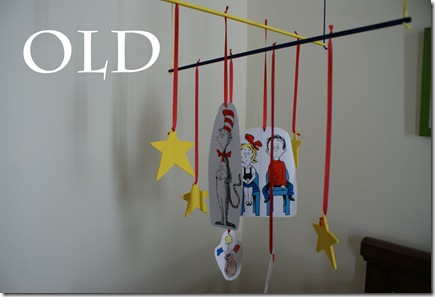
Last week my son quietly woke up from his nap. Then he stood up in his crib to go play with his mobile, which was located within his grasp. I came in to check on him, after I heard him laugh, to find that he had destroyed his mobile. He had pulled off all the hanging pieces and ripped them up. Now under normal circumstances I may have been upset. That was not the case in this situation. I was actually thrilled that he had done this. I hated the mobile. I was never a fan of it. It was something that I had made, but wasn’t satisfied with. The only reason I kept it around was because it was magical. Yep, we called it the magical mobile. Anytime my son would cry uncontrollably all we had to do was put him in front of the mobile and the tears stopped. He loved it! But when I found it destroyed not only was I thrilled that it was gone, but I was excited that I was going to be able to make him another one!

I knew exactly what I wanted to do this time around! In my Dr. Seuss Storage box post, I mentioned how I attempted to wall paper an entire wall with pages from a Dr. Seuss book. It was a disaster. So I had a few extra pages left over from this failed experiment. Some I used to create the storage bins. Others I used for this new mobile.

$

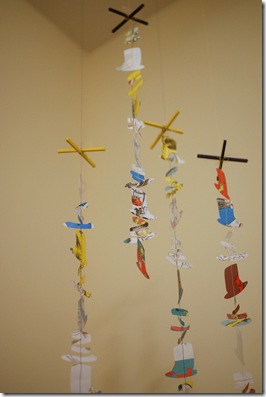
I started out by cutting the pages into the shape of the cats hats- you know The Cat, the one in The Hat. And actually I didn’t do any of the cutting. My circuit did it all for me. I fed my child breakfast while my machine cut away.

I wasn’t sure if it would make sense to have just a bunch of solid hats, since the Cats Hat is striped. So I cut out half of the hats in stripes and half of the hats in solid.     

DSC00731 

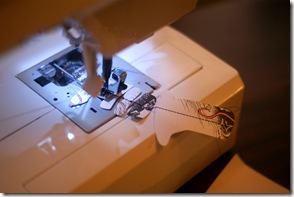
The next step was to sew them all together. I ran all of the pieces through my sewing machine. I switched the color of thread for each strand. Some I did in yellow and some I did in blue.
 DSC00786 DSC00824

Here is one completed strand.

DSC00766 

I hung each strand to two wooden sticks that I painted blue and yellow.

DSC00794DSC00843

I absolutely love how this turned out. I know that this mobile may not be everyone's taste. It works so well in the room. It goes a long a lot better with the type of feel that I was going for in the room.

DSC00926DSC00894

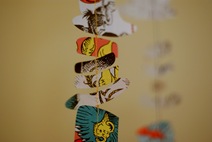
Here is a closer look at some of the hats.

DSC00877DSC00876DSC00874

I wish that I slept in the crib so I could stare at these every night. So fun! DSC00881DSC00922 

And most importantly my son loves it! (And it is conveniently out of his grasp :)   

DSC00951

41D7BC788C40AFDD713E5833753FB8F5

Dr. Seuss Storage Boxes

Monday, January 17, 2011

My son has a Dr. Seuss themed nursery.

DSC03764-1

I loved every thing about his room except for one tiny little storage issue. Look how you can see everything on the shelves of his armoire. Actually it doesn’t look too bad in this before picture. Usually, blankets and junk were just thrown in every which way, it drove me nuts, and I needed a solution. I hunted for the perfect storage bin. I couldn’t find anything that was the perfect price, color, and size. So my solution, as it usually is, was to make my own.

 DSC03814

I found that the small size moving boxes from Home Depot (you know the ones that only cost $0.69) were the exact size of the shelves. All I needed to do was make them pretty. Fortunately for me I had some left over book pages from this failed experiment… YIKES!

DSC06709

I had tried to wallpaper an entire wall with Dr. Seuss book pages. Cool in theory, but giant headache in real life. Literally a throbbing pain came into my head every time I entered his room. It was too much.
I took the unused, already torn out of book pages, and repurposed them for a few storage boxes.

Horton Hears a Who
 DSC08116 DSC08117

The Sneetches  
DSC08125DSC08128

If I Ran the Zoo         
DSC08133DSC08136

I even lined the boxes with fabric and glued a different color ribbon along the top edge of each box.
DSC08129DSC08138
      
Here is my tip for this project. If you line the boxes I recommend cutting open the box first, laying it flat, and then gluing down the fabric. It will be a lot easier than trying to glue in the fabric once the box is already assembled. Then once the fabric has been glued down, just use some hot glue to reassemble the box.

DSC08115

This was one of those projects that I just couldn’t get out of my head and I knew that I just had to complete so I could move on with my life ;) So finally at midnight one night I got to it. I wanted this done as quickly as possible. These weren’t perfectly executed. I recommend taking your time and making sure that you smooth out any bumps that you have in the paper or fabric. That is what I would have done differently.

DSC08145     

But, they have held up great and they hide all of the stuff that I don’t want to look at it! I love them for it!

DSC00145DSC00147 

And since this is an organizational post, here is where I store his diapers, wipes, and other changing table necessities.

DSC03786

And here is where I store a few of his books and toys. These are old baskets I had from back in college. I just updated them with a few pieces of colorful ribbon.

DSC06705

Visit thecsiproject.com

Related Posts Plugin for WordPress, Blogger...
Blog contents © better together 2010. Blogger Theme by Nymphont.