Showing posts with label Organization. Show all posts

Cookie Sheet To Do List Tutorial

Tuesday, April 17, 2012

Today I want to share the tutorial on how to create the to do list from my organization board.

SONY DSC

I started with the items pictured below:
  • cookie sheet size 9x13
  • 2 rulers
  • a role of wrapping paper
  • a wooden rod or a hanger(just cut the bottom of the hanger off to create a rod)
  • a pad of construction paper
All items were purchased at the dollar store. The final total to complete this project was $5.

SONY DSC

Lets look at how to create your own to do list:

1. Start with your rulers. Make sure you purchase rulers that have a hole at the end. Or you can purchase rulers without holes. You will just need to drill your own holes into the ruler. I say take the easy way and get rulers with the holes.

rulers

2. Cut one of your rulers. My cookie sheet measured 9 inches across. I cut my ruler down to 8 inches. Although, I wish that I had cut it at about 8 1/2 inches. You may want to try that length instead. As you make this cut, make sure that those 8 inches of ruler don’t include the hole. You will need the hole in the next step.

SONY DSC

3. Next cut the holes off the end of both rulers. I cut each of mine at 1 1/2 inches long.

DSC02781

My cookie sheet is about 3/4 of an inch tall. Whatever the height of your cookies sheet make sure that the ruler hole sits above the top edge of the cookie sheet. You are going to stick your rod through the ruler hole. You want to make sure that the rod sits above the cookie sheet so that it can be easily removed so you can replace your roll of paper when it runs out.

DSC02780

4. Cut your roll of wrapping paper. You want to cut it 1/2 an inch shorter than you cut your ruler length in step 2. I cut up my roll of wrapping paper into 7 1/2 inch pieces. I was able to cut my roll of wrapping paper in to three pieces. Now I have a roll for my to do list, plus two back up rolls for when I run out.

SONY DSC

5. Next cut your rod. If your rod or your hanger is longer than your cookie sheet than you will need to cut to the correct length. I cut my rod down to an 8 1/2 inch piece. Just shorter then the width of my 9 inch cookie sheet.

SONY DSC

6. Next I painted my ruler pieces white.

SONY DSC

7. Once the ruler was dry, I glued it to my cookie sheet. First I glued the ruler ends with the holes to the top sides of my cookie sheet.

SONY DSC

Then I glued the 8 inch piece of ruler to the bottom middle of my cookie sheet.

SONY DSC

7. Next I took my rod and put it through one of the ruler holes.

SONY DSC

8. Then I slid on my roll of paper, and then I pushed the rod through the second ruler hole.

SONY DSC

9. Then I took the roll of paper and slid it down though the ruler. The reason for this being that when I need to cut off my to do list, I can scroll the paper through the ruler and rip it off with the sharp edge of the ruler.

SONY DSC

Now you can create your own to do list with just a few dollar store items.

SONY DSC
41D7BC788C40AFDD713E5833753FB8F5

Dollar Store Organization Board

Monday, April 16, 2012

Incase you were not aware, Angela is competing in Season 11 of So You Think You're Crafty. Voting for week 2 is up. This week is thrift store week. Head on over to vote for your favorite project.
________

DSC03419 copy

Last weeks theme in the competition was Dollar Store Crafts. To be honest, before I received this theme I had never been into a dollar store to look for craft supplies. Mostly, this was the case because I did not think there were any dollar stores near my home. So I did a little Google search and found that there were 2 dollar stores within five minutes of my home. And one of those dollar stores was even within walking distance of my home. I was shocked as I kind of pride myself on knowing my city fairly well.

Now I must say that I have been turned on to a whole new place to go craft shopping. I think I may be addicted to dollar stores now. Ha! When I went into the dollar store for the first time I happened to be running errands with my mom and my son. We drove up to the dollar store just as my son feel asleep. I didn't want to wake him. My mom offered to stay in the car while I ran inside real quick. That was my plan. I said, "I'm going to run inside real quick, grab something, and then figure out what to do with it later." Well 20 minutes after entering the store, I get a phone call from my mother asking if everything was okay. Haha! I had so many ideas on what to do that I couldn't decide. So I picked the craft that would be the most practical. That is how the dollar store organization board came to be.

I started with a few frames in various sizes and colors. I also picked up a cookie sheet, a pack of rulers, a roll of wrapping paper, a pack of construction paper, a tin pail, and some hangers.
SONY DSC
DSC03337 copy

The “To Do List” is my favorite part of this whole board. Staying true to using dollar store supplies, I created this using a cookie sheet, 2 rulers, a roll of wrapping paper, a hanger, and some construction paper for decoration. I’ll share the tutorial on how to create this, tomorrow.
SONY DSC

I created some printables to go inside each frame. I have a weekly menu planner. It sits in a 5x7 frame. I can write on the frame what we will be having for dinner each night. When the week is over I can just wipe it off and start over again. This frame was originally black. I used some white construction paper to cut out a scallop frame that I glued on top of it.
SONY DSC

I also created a monthly calendar. It sits in a 8x10 frame. I can write in each box what will be going on each day. The frame was originally brown. I used yellow construction paper to create a border around the frame. I also made my own calendar for the month of April. Then one day while looking through Pinterest I found some calendars in the exact yellow and blue colors that I used. So to save some time creating a new calendar each month, I will just use the premade calendars that can be found HERE.
SONY DSC

I also made a daily, weekly, and monthly cleaning checklist. Each sit in a 4x6 frame. I left two of the frames silver. Then I covered the third frame in another white scallop border.
SONY DSC

I was also able to find a pail in the perfect blue color to hold my pens.
SONY DSC

There you have it. My dollar store organization board.
DSC03419 copy

Are you interested in any of these printables? From now until the end of May we will be offering up the weekly menu planner and the daily, weekly, and monthly calendars on our Facebook page. The menu planner prints in size 5x7. The cleaning checklists print in size 4x6.
menu_edited-1
daily yellowweekly yellowmonthly yellow

Are you not interested in the blue and yellow? We are also offering them in pink as well. You can download either version on our Facebook page. If you already like us on Facebook you download these by clicking on the Free gift box at the top of our page.

*Update these printables can now be downloaded from the printables tab at the top of our blog. 

menu pink
daily pinkweekly pinkmonthly pink


41D7BC788C40AFDD713E5833753FB8F5

The Cash Wallet- Part 2

Friday, August 12, 2011


Thanks Angie for helping me make my awesome cash wallet! I am so thrilled to be trying out a new way to budget- The Cash Envelope System. I have always wanted to try to use the cash envelope system. This is a system where you just pay cash for everything. The cash is divided into categorized envelopes. I was always nervous that I would lose the envelopes or that they would get buried in the bottom of my purse. Well now I have the envelopes built into my wallet so I don't have to worry anymore. I no longer have an excuse not to do it.

Here are the simple steps for using a cash envelope system:

1. Decide each month how much you are going to spend on a category (ie: $200 for groceries, $50 for clothes etc.)
2. Take that out in cash and stick it in the envelope for that category
3. When it is gone, it's gone! You aren't spending more than you planned.
4. You now know how much you are actually spending.

I really hope this encourages everyone to try this. Even if you aren't on a tight budget, this is still perfect because at the end of the month you aren't scratching your head saying, how did I spend $321 on eating out?

I would love to hear your success stories using the cash envelope system. I would also love to hear any other great budgeting tips that have worked for you!

The Cash Wallet- Part 1

Thursday, August 11, 2011

*Update: The Cash Wallet tutorial is no longer available for free. It available in the shop Walter and Veronica, for a very reasonable price.

I have been helping Whitney with a little project that she has been working on. She is starting a new budgeting system, which she will explain tomorrow. She wanted a cute wallet to help out with this new system- maybe give her a little more motivation to stick to her plan ;) I helped Whitney sew together a cute cash wallet.

DSC07488

We used this pattern to help us create the wallet. We used it more as a guideline for our measurements, but then we took our own spin on the project. If you go check out the tutorial, you will see that we used a button instead of a Velcro closure, we used fabric instead of vinyl, and we also used Velcro for the cash pockets instead of zippers. There are a few other little differences as well.

DSC07489DSC07491

There are 6 pockets for cash. Whitney will explain why tomorrow. Each pocket is held closed with Velcro.

DSC07496DSC07508

There is a back pocket to hold your receipt's, coupons or checkbook.

DSC07500

There are pockets up front to hold your ID’s and credit cards.

DSC07502DSC07506-1

It is a cute wallet! I hope it keeps Whitney motivated to stick to her new budget!

41D7BC788C40AFDD713E5833753FB8F5

Where We Create- Angela

Tuesday, January 25, 2011

Let me introduce you to a part one of a three part series we would like to call Where We (Wray sist3rs) Create. Our space whether it be our kitchen, our sewing room, or our favorite place to run is important to us. They are places where we can be ourselves and create projects, dinners, or a stronger/healthier us. For the next three Tuesdays we will take turns. Whitney will share where she cooks, Lauren will share where she runs, and I will share where I sew.

Today, I(Angela) will start off. As I mentioned yesterday I am in the process of reorganizing my craft room(although, I updated yesterdays post so I may have taken that part off.) I am still in the middle of the reorganizing process, but I am happy to share what I do have done.

Here is my sewing table. DSC00472

I repurposed old baby formula cans into my storage containers. I used paper and flowers to spruce them up a bit.

imageimageimageimage

I have eight of these floating around the room. They hold anything from pens, pencils, glue to buttons, fabric scraps, and even clothes pins.

DSC00285DSC00288 

And since I am on the topic of repurposing, I use an old William Sonoma Peppermint Bark tin to hold extra bobbins, thread, and pins.

DSC00257

A while back I fashioned my own thread rack. It is made out of hot glue and toothpicks. I glued two toothpicks together. Then I glued them to the back of my shelf. I was skeptical on whether or not it would hold up, but it works! I just need to add some more now.

DSC00468

Here is my ribbon holder. It used to be a tea cup holder. I purchased these cups at World Market a while back. They are now hanging on a rack in my Kitchen. So I repurposed my cup holder into a ribbon holder.

DSC00334image

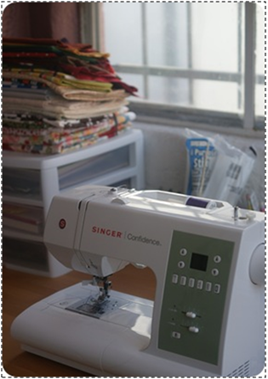
Here is my machine. It isn’t anything fancy. I know people can be picky about their brand of machine. I learned to sew on a Singer. It is what my Mom uses and now I use one. I love it!

 imageDSC00478

A clock that my husband picked up for me one day. He went to Wal-Mart to get diapers and he came home with a gift for my craft room.

imageimage

I just took down my inspiration wall to hang my embroidery thread. I used to have a big cork board here with all of my ideas on it. I never use it anymore. See the internet is a glorious place. Now if I find inspiration, I usually bookmark it. I would rather look at beautiful colored thread anyway.

DSC00349

Now you have a little peak into my creative space.

41D7BC788C40AFDD713E5833753FB8F5

Where We Create- Lauren

Related Posts Plugin for WordPress, Blogger...
Blog contents © better together 2010. Blogger Theme by Nymphont.