Baby Bibs- Part 3 (The BibCape)

Sunday, January 9, 2011

So remember the questions that I asked yesterday?

Now what do you do with the rest of the T-Shirt that you haven’t used yet?

Well let me show you what I did…

Surprise! Surprise! I made more bibs… or did I?

Let me present to you the BibCape- Yep, one word! By day it is a Bib, and by night…

Ok, so my 9 month old has no clue what at a bib is, let alone a cape. As long as it tastes good when it goes in his mouth is all that he cares about. So if you have an older son this might work better as long as your T-Shirt was big enough. Since I only have one son- a BibCape is what he gets.

DSC09750 

Now my son had, had it with the picture taking. So you will just have to use your imagination to picture what an adorable Batman he makes. (And yes, I just used Batman and adorable in the same sentence.) DSC09840DSC09851

The BibCape

***And what happened to the pics in Part 2? Gone… for now. Easier to follow pictures coming by the end of the week.

41D7BC788C40AFDD713E5833753FB8F5

Baby Bibs- Part 2 (Tutorial)

Saturday, January 8, 2011

Let’s get started making these fun bibs…

Step 1.

Round up a bunch of T-Shirts. I am sure you or your husband or someone that you know has a bunch just lying around. If that is not the case then I suggest going to Old Navy. They have a great clearance section. Plus every once in a while they have $3 T-shirt Saturdays. I know because my husband has dragged me to a few. I also suggests going to Good Will or whatever Thrift store that you have in your area(if you don’t mind used). T-shirts are always $2 at my Good Will, plus on Saturday’s everything is 50% OFF- so $1 T-shirts every Saturday. Can't beat that price.

DSC08958 

Step 2.

Trace your design. Now I just traced a bib that I already owned and that I knew fit my child well. I would suggest doing that too then you can make sure you have a bib that fits your baby. My guy is 9 months and on the bigger side. He is in the 97% for almost everything. My size bib might not be the best for your child. I am willing to upload my pattern if you are interested. The dimensions for my bibs are 11 1/2 inches long, 7 1/2 inches from the neck opening. 8 1/2 inches wide.

Tip! I would fold your stencil in half to make sure that it is completely symmetrical.

I recommend tracing with chalk. It is not permanent if you mess up. Also since you are cutting out around a design on a T-Shirt, you may want the design centered. This way you know whether the design is centered before you cut! I also recommend leaving the chalk outline it will come in handy later when you are sewing.

You can also cut the bib into any shape that you would like. As you saw before, my Gamer bib is square. I did that so I could incorporate more of the design and I love it! So you may have to work around you design if you can’t get it to fit exactly inside the perimeters of your stencil.

DSC01600DSC01602DSC01603

Step 3.

Cut out your bib. I suggest cutting out around the chalk line instead of cutting directly on the line. Then you will have a an extra edge while sewing. I cut two pieces of fabric. One with the design for the front. Then one without the design for the back of the bib.

DSC01605

Step 4.

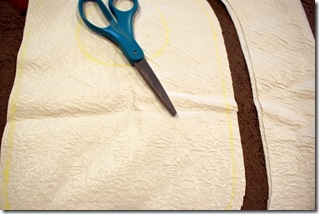
Cut out your oilcloth. This is what I put in the middle of the bib. It keeps the drool from soaking through so baby stays nice and dry. I got this on clearance at Joann's, plus it was at the end of the bolt so I got an additional 50% off since it wasn’t exactly a yard. Score!

DSC01607DSC01608

Step 5.

Pin together. You will want to put the oilcloth on the bottom. The T-Shirt design on the the middle. The blank T-Shirt (what you are using for the back of the bib) on top.

DSC01611DSC01610 

Step 6.

Sew. Sew all the way around except make sure to leave a little opening at the bottom so you can turn your bib right-side out. 

DSC01613DSC01615


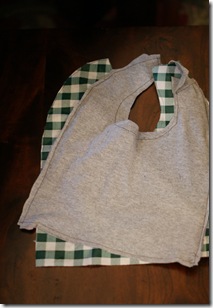
Tip! This is knit you are working with. Knit can be my worst enemy at times. It goes this way and that way and stretches. You have to be careful. That is why I suggested keeping the chalk outline on your bib. If you sew directly on the chalk outline you will get better results. First, it helps keep the bib symmetrical. Second, since this is knit   and it tends to move around during sewing, the chalk outline helps show where you should be versus where you actually are. I started off not using the chalk outline and look what happened. The knit was slipping all over the oilcloth even while pinned  down. This was my end result…

Whoops! It was late at night. I obviously wasn’t paying much attention.
DSC09588

Step 7.

Cut off any extra edges. You don’t want to leave too much or it will make the bib bulky.

DSC01616

Step 8.

Turn bib right-side out and Iron.   

DSC09912

Step 9.

Pin the bottom opening together and sew shut. Now depending on how obvious the stitch is you can just sew the opening closed or you can top stitch the edge of the entire bib. Also, if you sew a top stitch around the edge of the entire bib, it will lay more flat. I forgot a velcro picture but just place one piece of velcro on the top left front side of bib. Then place the other half of your velcro closure to the top right back side of bib.

DSC09910DSC09911

Step 10.

Add velcro and Wear!

I forgot a velcro picture but just place one piece of velcro on the top left front side of bib. Then place the other half of your velcro closure to the top right back side of bib. Velcro usually comes with a sticky backing, but I usually sew the velcro on for extra stability.

DSC09623 

Any questions? Feel free to comment if you do.

Now what do you do with the rest of the T-Shirt that you haven’t used yet? Stay tuned! I’ll let you know what I did, tomorrow.

41D7BC788C40AFDD713E5833753FB8F5

Baby Bibs- Part 1 (T-Shirt Bib)

Friday, January 7, 2011

Impressive is the word that people use on a daily basis to describe the mass amount of drool that comes out of my child. After getting frustrated from having to change my son’s shirt numerous times a day, I finally decided to begin my quest for the perfect bib. I just haven't been able to find any bibs that fit my needs and suit my style. So I finally decided to make my own.

I really wanted bibs that matched my child's outfits. The perfect solution for me was to use T-shirts. T-shirts were designed to be part of an outfit. Even better there are so many T-shirt options out there that you can find any shirt to fit your style or the style you are looking for, for your baby.

Below are the ones I made. I thought I would give my son some options :)

The Lifeguard

DSC09596  DSC09600  DSC09690

The Rocker

DSC09623 DSC09619 DSC09689

The Skater

DSC09626 DSC09699
DSC09627 
On a completely different note… every baby boy should own a pair of high top sneakers! Adorable!
DSC09632 
The Gamer

DSC09650 DSC09655   
DSC09804

The LunchtimeDSC09680 DSC09682DSC09816
I am in love with these bibs! They turned out better than expected! Tutorial coming tomorrow. Also coming soon, what to do with all of the left over t-shirt material that you didn’t use.

41D7BC788C40AFDD713E5833753FB8F5

Easy Christmas Card Holder

Thursday, December 9, 2010

Want an easy(and cheap) way to display your Christmas cards? I’ve got the solution!

What you need:

  • Ribbon
  • Holiday Paper
  • Glue
  • Scissors
  • Clothes Pins

What you do:

1. Cut strips of paper the size a clothes pin.

2. Glue paper to clothes pins.

3. Hang long strips of ribbon (mine are hanging in my dining room.)

4. Attach clothes pins to ribbon

Can’t get any easier than that! All skills required for this were learned in kindergarten.

DSC08772  DSC08765

You’ll have to use your imagination here because we have only received two cards so far. The more cards that I receive the more ribbon I’ll hang. I hope to have the curtains covered by the end of this Holiday season!

DSC08788  DSC08763

41D7BC788C40AFDD713E5833753FB8F5

Coupon 101

Wednesday, December 8, 2010


There are so many things I want to share on my first post and I don’t know how to start. But I do know that I want to start out with the very basics of couponing.  It may seem silly for me to eagerly wait for my Sunday newspaper but inside holds these tiny pieces of paper that can literally save you thousands of dollars. The whole idea of cutting, organizing, and shopping with coupons is just so exciting to me.  I want to hopefully get your coupons veins pumping. I’ll share what I think are the best ways and tips to know to start couponing.
1.     Get 1 Sunday newspaper per person in your family. That way, when you find a really good deal, you can stock up and have enough for everyone in your home.
2.     Kroger brands (Smith’s, King Soopers, Dillons) doubles the value of your coupon everyday up to $1.00. So if you have a coupon for .40 it will double to .80 or if you have a coupon for .60 it will double to $1.00. Although it may seem like nothing, but those savings really add up!
3.     Let others do the work for you. There is no way I would enjoy this as much if somebody didn’t help my find the deals.  There are websites and blogs everywhere that tell you where the best deals are and what coupons to pair that deal up with. My favorite is http://www.moneysavingmom.com/
A good Utah based coupon site is http://www.freebies2deals.com/
A good Denver site is http://denverbargains.com/
4.     Find a system that works for you. There are many different ways and levels to coupon. Maybe I’ll make that my next post!
The effort you put into this will definetly pay off . This weeks challenge. Go out and find an item you can get for free my couponing. You’ll be amazed at what you can find. I’ll start off my giving you one:  go here and find the $1 off suave product. Target has Suave shampoo and conditioner on sale for .84-.97 this week. Use this coupon to get it for free plus a .3-.16 profit!

Related Posts Plugin for WordPress, Blogger...
Blog contents © better together 2010. Blogger Theme by Nymphont.